SpringMVC
1,MVC
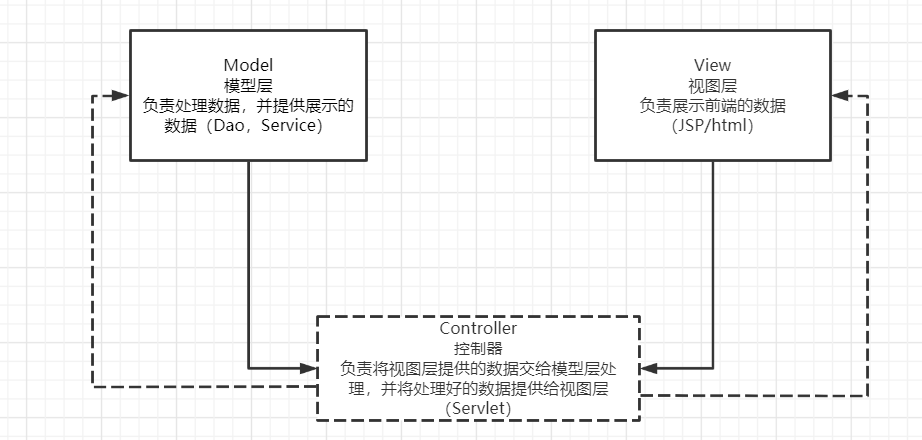
MVC 模式代表 Model-View-Controller(模型-视图-控制器) 模式。这种模式用于应用程序的分层开发。
- Model(模型) - 模型代表一个存取数据的对象或 JAVA POJO。它也可以带有逻辑,在数据变化时更新控制器。
- View(视图) - 视图代表模型包含的数据的可视化。
- Controller(控制器) - 控制器作用于模型和视图上。它控制数据流向模型对象,并在数据变化时更新视图。它使视图与模型分离开。
2,MVC执行流程详解
图解
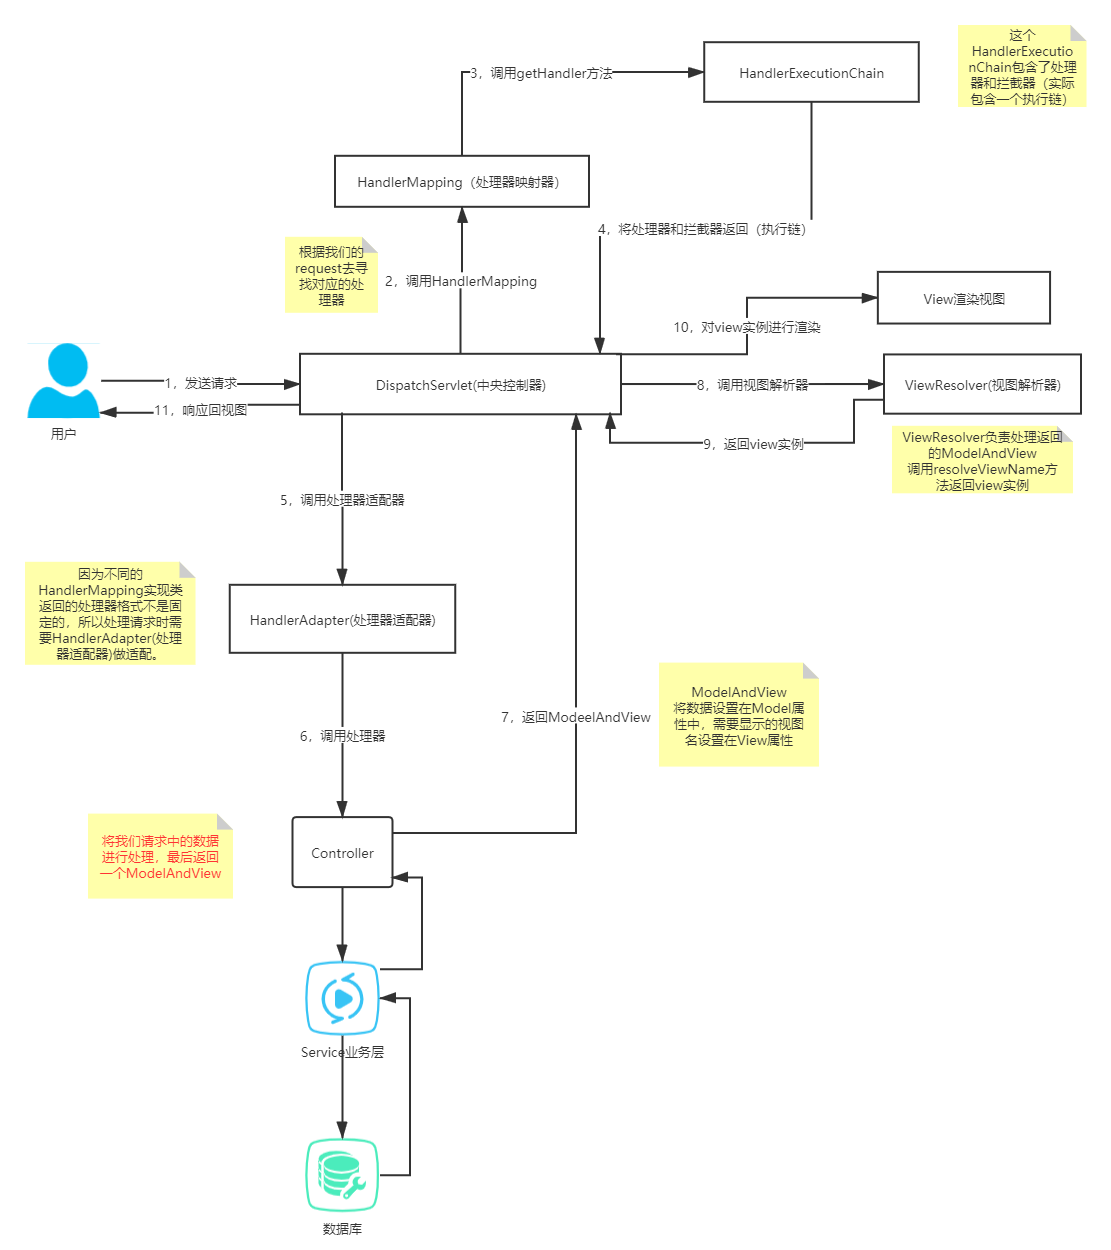
极其详细的MVC流程:https://zhuanlan.zhihu.com/p/91835444
HelloSpring
通过详细的配置实现
-
在web.xml位置文件中配置我们的中央处理器DispatcherServlet
1
2
3
4
5
6
7
8
9
10
11
12
13
14
15
16
17
18
19
20
21
22
23
24
25
26
| <?xml version="1.0" encoding="UTF-8"?>
<web-app xmlns="http://xmlns.jcp.org/xml/ns/javaee"
xmlns:xsi="http://www.w3.org/2001/XMLSchema-instance"
xsi:schemaLocation="http://xmlns.jcp.org/xml/ns/javaee http://xmlns.jcp.org/xml/ns/javaee/web-app_4_0.xsd"
version="4.0">
<servlet>
<servlet-name>springmvc</servlet-name>
<servlet-class>org.springframework.web.servlet.DispatcherServlet</servlet-class>
<init-param>
<param-name>contextConfigLocation</param-name>
<param-value>classpath:applicationcontext.xml</param-value>
</init-param>
<load-on-startup>1</load-on-startup>
</servlet>
<servlet-mapping>
<servlet-name>springmvc</servlet-name>
<url-pattern>/</url-pattern>
</servlet-mapping>
</web-app>
|
-
在我们的Spring配置文件中注册处理器映射器(HandlerMapping),处理器适配(HandlerAdapter),视图解析器(DispatcherServlet)
1
2
3
4
5
6
7
8
9
10
11
12
13
14
15
16
17
18
19
20
| <?xml version="1.0" encoding="UTF-8"?>
<beans xmlns="http://www.springframework.org/schema/beans"
xmlns:xsi="http://www.w3.org/2001/XMLSchema-instance"
xsi:schemaLocation="http://www.springframework.org/schema/beans http://www.springframework.org/schema/beans/spring-beans.xsd">
<bean class="org.springframework.web.servlet.handler.BeanNameUrlHandlerMapping"/>
<bean class="org.springframework.web.servlet.mvc.SimpleControllerHandlerAdapter"/>
<bean class="org.springframework.web.servlet.view.InternalResourceViewResolver" id="internalResourceViewResolver">
<property name="prefix" value="/WEB-INF/jsp/"/>
<property name="suffix" value=".jsp"/>
</bean>
<bean id="/hello" class="cn.xpp.controller.HelloController"/>
</beans>
|
-
编写处理器Controller
1
2
3
4
5
6
7
8
9
10
11
12
13
14
15
| public class HelloController implements Controller
{
@Override
public ModelAndView handleRequest(HttpServletRequest request, HttpServletResponse response) throws Exception {
ModelAndView mv=new ModelAndView();
mv.addObject("msg","helloSpringmvc");
mv.setViewName("Hello");
return mv;
}
|
-
别忘了由于我们选用的处理器映射器BeanNameUrlHandlerMapping比较特殊需要通过id寻找映射,需要在Spring配置文件中注册Bean
1
| <bean id="/hello" class="cn.xpp.controller.HelloController"/>
|
我们发现使用SpringMVC时需要写不少的配置文件,比之前的javaweb并没有轻松很多,但是我们在实际开发中不会使用配置文件实现MVC,而是注解
问题
当我们检查所有的代码的时候发现并没有问题,但是请求资源就是报404。
这种情况很有可能就是我们生成项目时没有把Spring的jar包加入
这时需要点开IDEA的项目结构的工件
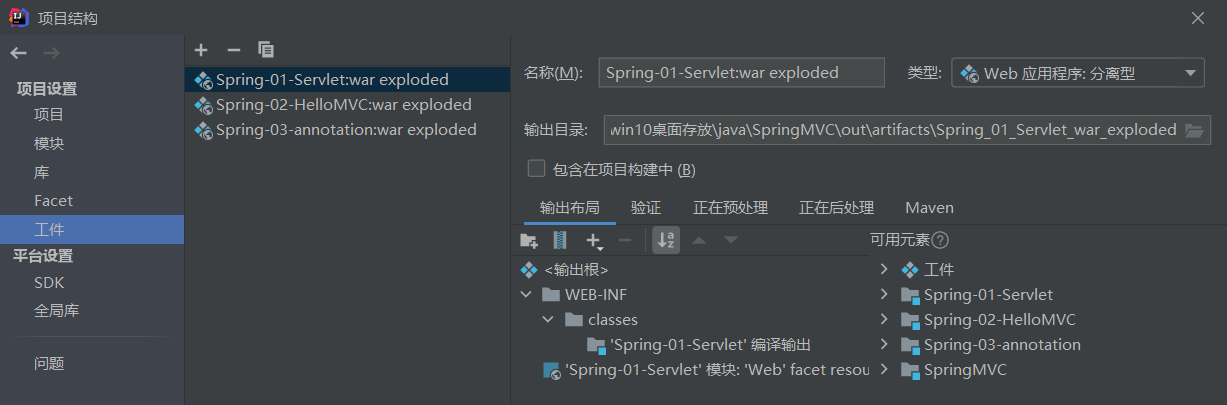
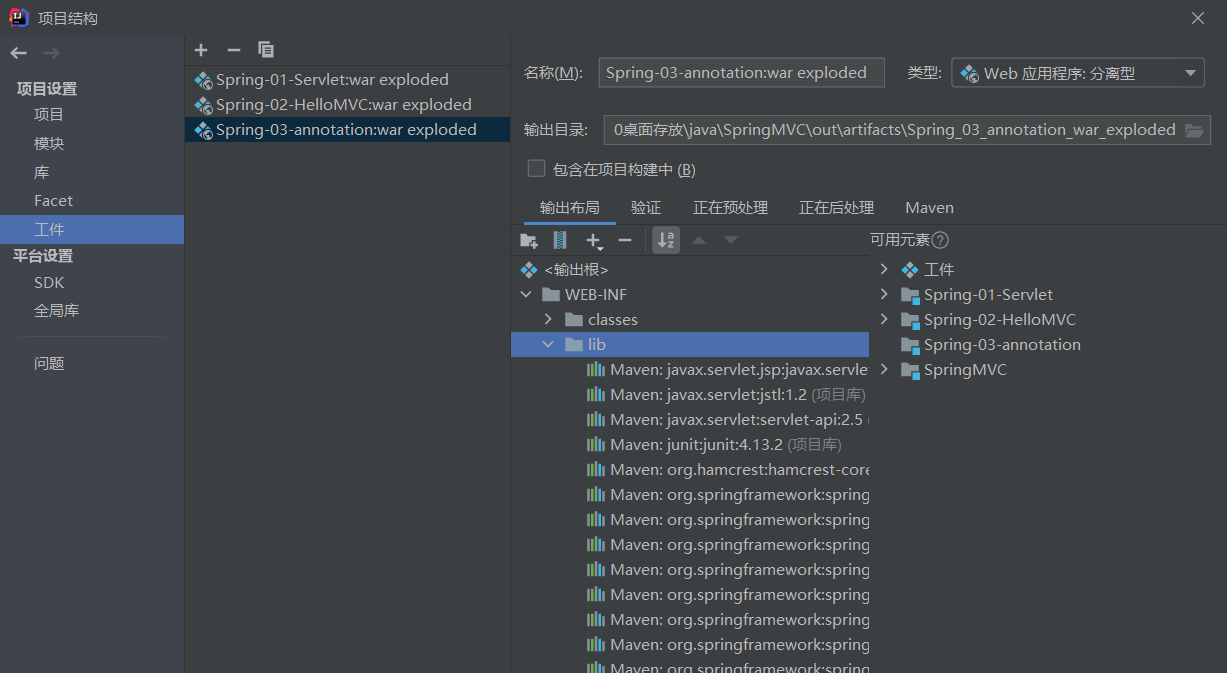
我们发现工件下打包的项目不包含lib目录
所有我们需要添加lib目录并加入所有项目的jar包
3,注解开发MVC
注解开发MVC有几个是不变的
流程
-
在web.xml位置文件中配置我们的中央处理器DispatcherServlet
1
2
3
4
5
6
7
8
9
10
11
12
13
14
15
16
17
18
19
20
21
| <?xml version="1.0" encoding="UTF-8"?>
<web-app xmlns="http://xmlns.jcp.org/xml/ns/javaee"
xmlns:xsi="http://www.w3.org/2001/XMLSchema-instance"
xsi:schemaLocation="http://xmlns.jcp.org/xml/ns/javaee http://xmlns.jcp.org/xml/ns/javaee/web-app_4_0.xsd"
version="4.0">
<servlet>
<servlet-name>springmvc</servlet-name>
<servlet-class>org.springframework.web.servlet.DispatcherServlet</servlet-class>
<init-param>
<param-name>contextConfigLocation</param-name>
<param-value>classpath:springmvc-servlet.xml</param-value>
</init-param>
<load-on-startup>1</load-on-startup>
</servlet>
<servlet-mapping>
<servlet-name>springmvc</servlet-name>
<url-pattern>/</url-pattern>
</servlet-mapping>
</web-app>
|
-
在spring配置文件中设置,自动扫描包,注册视图解析器,开启注解支持,不处理静态资源等
1
2
3
4
5
6
7
8
9
10
11
12
13
14
15
16
17
18
19
20
21
| <?xml version="1.0" encoding="UTF-8"?>
<beans xmlns="http://www.springframework.org/schema/beans"
xmlns:xsi="http://www.w3.org/2001/XMLSchema-instance"
xmlns:context="http://www.springframework.org/schema/context"
xmlns:mvc="http://www.springframework.org/schema/mvc"
xsi:schemaLocation="http://www.springframework.org/schema/beans http://www.springframework.org/schema/beans/spring-beans.xsd
http://www.springframework.org/schema/context https://www.springframework.org/schema/context/spring-context.xsd
http://www.springframework.org/schema/mvc https://www.springframework.org/schema/mvc/spring-mvc.xsd">
<context:component-scan base-package="cn.xpp.controller"/>
<mvc:default-servlet-handler/>
<mvc:annotation-driven/>
<bean class="org.springframework.web.servlet.view.InternalResourceViewResolver" id="internalResourceViewResolver">
<property name="prefix" value="/WEB-INF/jsp/"/>
<property name="suffix" value=".jsp"/>
</bean>
</beans>
|
-
书写实现类 @Controller(声明这是一个处理器,且自动被Spring托管) @RequestMapping(“XXX”)(该方法的请求地址)
1
2
3
4
5
6
7
8
| @Controller
public class HelloAnnotationMVC {
@RequestMapping("/hello")
public String hello(Model model){
model.addAttribute("msg","你好注解MVC");
return "hello";
}
}
|
问题
如果检查代码没有问题还是报404,则可以参考2:MVC执行流程详解——问题
不同注解,相同作用
不同注解,相同作用的目的是便于区分各个层
- @Component 声明为Spring的组件
- @Servlet 写在servlet层
- @Controller 写在controller层
- @Repository 写在dao层
4,RestFul风格
REST(英文:Representational State Transfer,简称REST,意思:表述性状态转换,描述了一个架构样式的网络系统,比如web应用)。
它是一种软件架构风格、设计风格,而不是标准,只是提供了一组设计原则和约束条件,它主要用于客户端和服务端交互类的软件。基于这个风格设计的软件可以更简介,更有层次,更易于实现缓存等机制。
它本身并没有什么使用性,其核心价值在于如何设计出符合REST风格的网络接口。
RESTful示例
- /account/1 HTTP GET:得到id=1的account
- /account/1 HTTP DELETE:删除id=1的account
- /account/1 HTTP PUT:更新id=1的account
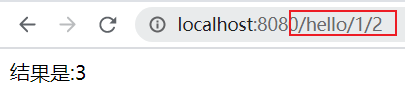
- method = RequestMethod.GET 设置请求方式为GET
- @PathVariable:可以解析出来URL中的模板变量({a}/{b})
1
2
3
4
5
6
7
8
9
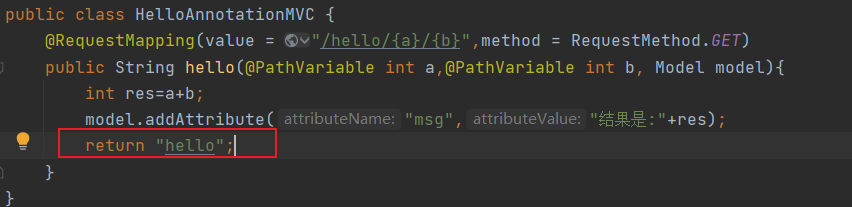
| @Controller
public class HelloAnnotationMVC {
@RequestMapping(value = "/hello/{a}/{b}",method = RequestMethod.GET)
public String hello(@PathVariable int a,@PathVariable int b, Model model){
int res=a+b;
model.addAttribute("msg","结果是:"+res);
return "hello";
}
}
|
RESTful的CRUD
由于我们需要设置请求方式每一次都要写method = RequestMethod.GET 这么一大长串,所以Spring为我们提供了各种请求方式对应的注解
- @GetMapping get请求方式
- @PostMapping post请求方式
- **@PutMapping ** put请求方式
- **@DeleteMapping ** delete请求方式
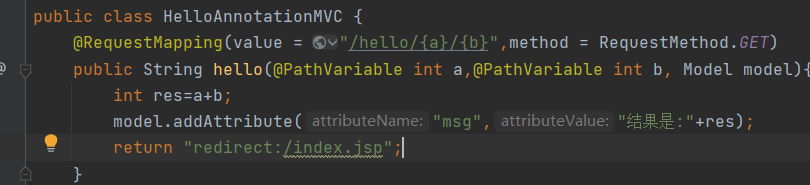
5,转发和重定向
在Spring中 return时不写任何前缀则默认调用视图解析器拼接前缀和后缀,然后进行转发
那如果我们想让视图解析器不解析转发而是重定向那么该怎么做
在需要返回页面的路径的前面加上redirect:关键字
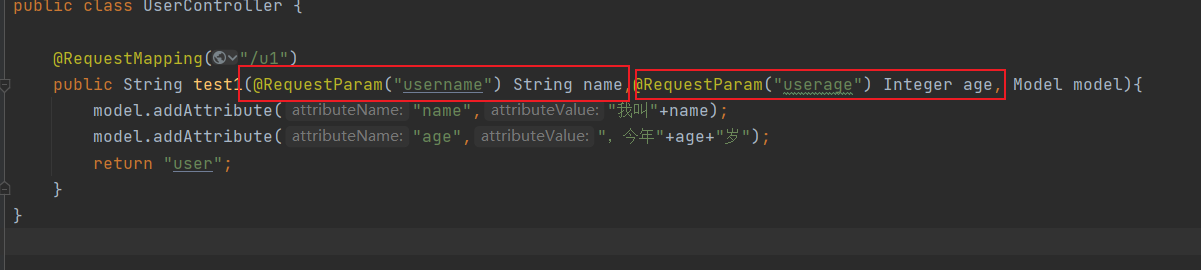
6,前端传参和后端回显
回想在JavaWeb阶段我们想要得到前端数据需要通过HttpServletRequest对象获取,不免一些麻烦,那再SpringMVC中怎么得到前端数据呢,很简单,我们在请求路径方法上的参数保持和url内请求路径的参数名一样即可,SpringMVC会自动映射

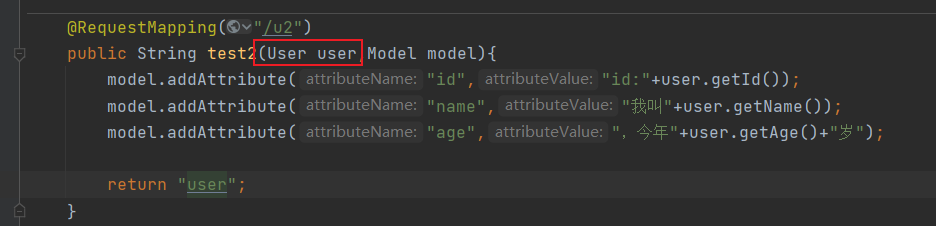
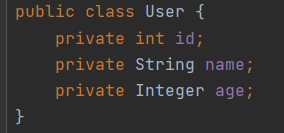
前端传入对象
当我们前端传入一个对象时,我们只需要保证url内的属性和实体类的属性一一对应,名字一致即可,SpingMVC会自动匹配

7,乱码问题
解决乱码的唯一办法就是编写过滤器
**方法一:**使用我们自己写的过滤器
1
2
3
4
5
6
7
8
9
10
11
12
13
14
| public class EncodeingFilter implements Filter {
@Override
public void init(FilterConfig filterConfig) throws ServletException {}
@Override
public void doFilter(ServletRequest request, ServletResponse response, FilterChain chain) throws IOException, ServletException {
System.out.println("修改编码");
request.setCharacterEncoding("utf-8");
response.setCharacterEncoding("utf-8");
chain.doFilter(request,response);
}
@Override
public void destroy() {}
}
|
在web.xml中注册(注意分别/和/*之间的区别!!!,前者不负责过滤.jsp文件,而后者负责,所以当我们编写过滤器时一定要写/*路径)
1
2
3
4
5
6
7
8
| <filter>
<filter-name>encodeing</filter-name>
<filter-class>cn.xpp.filter.EncodeingFilter</filter-class>
</filter>
<filter-mapping>
<filter-name>encodeing</filter-name>
<url-pattern>/*</url-pattern>
</filter-mapping>
|
**方式二:**使用Spring自带的编码过滤器CharacterEncodingFilter
在web.xml中注册(注意分别/和/*之间的区别!!!,前者不负责过滤.jsp文件,而后者负责,所以当我们编写过滤器时一定要写/*路径)
1
2
3
4
5
6
7
8
| <filter>
<filter-name>encodeing</filter-name>
<filter-class>org.springframework.web.filter.CharacterEncodingFilter</filter-class>
</filter>
<filter-mapping>
<filter-name>encodeing</filter-name>
<url-pattern>/*</url-pattern>
</filter-mapping>
|
**方式三:**可以去网上找大佬写的编码过滤器
注意【重要!!!】
在web.xml中注册(注意分别/和/*之间的区别!!!,前者不负责过滤.jsp文件,而后者负责,因为我们访问所有的jsp页面,所以当我们编写过滤器时一定要写/*路径)
8,JSON
JSON(JavaScript Object Notation, JS 对象简谱) 是一种轻量级的数据交换格式。它基于 ECMAScript (欧洲计算机协会制定的js规范)的一个子集,采用完全独立于编程语言的文本格式来存储和表示数据。简洁和清晰的层次结构使得 JSON 成为理想的数据交换语言。 易于人阅读和编写,同时也易于机器解析和生成,并有效地提升网络传输效率。
注解
- @RestController 作用域类上,该注释让类的所有方法都不走视图解析器,而是经过JSON解析返回字符串
- @ResponseBody 作用域方法上,该注释让方法不走视图解析器,而是经过JSON解析返回字符串
Jackson
导入依赖包(JSON有很多,这里我们选择Jackson)
1
2
3
4
5
6
|
<dependency>
<groupId>com.fasterxml.jackson.core</groupId>
<artifactId>jackson-databind</artifactId>
<version>2.12.2</version>
</dependency>
|
Java代码
1
2
3
4
5
6
7
8
| @RequestMapping("/j1")
public String test() throws JsonProcessingException {
User user=new User("张三",18,"男");
ObjectMapper mapper=new ObjectMapper();
String s = mapper.writeValueAsString(user);
return s;
}
|
Jackson关键类ObjectMapper 通过writeValueAsString方法,我们可以将值转换为JSON格式
乱码问题(只针对Jackson的乱码的问题)
我们在Spring的配置文件中加入以下配置即可
1
2
3
4
5
6
7
8
9
10
11
12
13
14
15
16
|
<mvc:annotation-driven>
<mvc:message-converters register-defaults="true">
<bean class="org.springframework.http.converter.StringHttpMessageConverter">
<constructor-arg value="UTF-8"/>
</bean>
<bean class="org.springframework.http.converter.json.MappingJackson2HttpMessageConverter">
<property name="objectMapper">
<bean class="org.springframework.http.converter.json.Jackson2ObjectMapperFactoryBean">
<property name="failOnEmptyBeans" value="false"/>
</bean>
</property>
</bean>
</mvc:message-converters>
</mvc:annotation-driven>
|
Fastjson
添加依赖
1
2
3
4
5
6
|
<dependency>
<groupId>com.alibaba</groupId>
<artifactId>fastjson</artifactId>
<version>1.2.76</version>
</dependency>
|

9,SSM整合
准备工作
导入Maven依赖和静态资源过滤
- junit
- lombok
- servlet
- jsp
- jstl
- c3p0
- mysql
- mybatis
- mybatis-spring
- spring-webmvc
- spring-jdbc
1
2
3
4
5
6
7
8
9
10
11
12
13
14
15
16
17
18
19
20
21
22
23
24
25
26
27
28
29
30
31
32
33
34
35
36
37
38
39
40
41
42
43
44
45
46
47
48
49
50
51
52
53
54
55
56
57
58
59
60
61
62
63
64
65
66
67
68
69
70
71
72
73
74
75
76
77
78
79
80
81
82
83
84
85
86
87
88
89
90
91
92
93
94
95
96
97
98
99
100
101
102
103
104
105
106
107
108
109
110
| <?xml version="1.0" encoding="UTF-8"?>
<project xmlns="http://maven.apache.org/POM/4.0.0"
xmlns:xsi="http://www.w3.org/2001/XMLSchema-instance"
xsi:schemaLocation="http://maven.apache.org/POM/4.0.0 http://maven.apache.org/xsd/maven-4.0.0.xsd">
<modelVersion>4.0.0</modelVersion>
<groupId>cn.xpp</groupId>
<artifactId>ssmbuild</artifactId>
<version>1.0-SNAPSHOT</version>
<build>
<resources>
<resource>
<directory>src/main/java</directory>
<includes>
<include>**/*.properties</include>
<include>**/*.xml</include>
</includes>
<filtering>false</filtering>
</resource>
<resource>
<directory>src/main/resources</directory>
<includes>
<include>**/*.properties</include>
<include>**/*.xml</include>
</includes>
<filtering>false</filtering>
</resource>
</resources>
</build>
<properties>
<maven.compiler.source>8</maven.compiler.source>
<maven.compiler.target>8</maven.compiler.target>
</properties>
<dependencies>
<dependency>
<groupId>junit</groupId>
<artifactId>junit</artifactId>
<version>4.13.2</version>
</dependency>
<dependency>
<groupId>org.projectlombok</groupId>
<artifactId>lombok</artifactId>
<version>1.18.18</version>
</dependency>
<dependency>
<groupId>javax.servlet.jsp</groupId>
<artifactId>javax.servlet.jsp-api</artifactId>
<version>2.3.3</version>
</dependency>
<dependency>
<groupId>javax.servlet</groupId>
<artifactId>jstl</artifactId>
<version>1.2</version>
</dependency>
<dependency>
<groupId>com.mchange</groupId>
<artifactId>c3p0</artifactId>
<version>0.9.5.5</version>
</dependency>
<dependency>
<groupId>mysql</groupId>
<artifactId>mysql-connector-java</artifactId>
<version>8.0.22</version>
</dependency>
<dependency>
<groupId>org.mybatis</groupId>
<artifactId>mybatis</artifactId>
<version>3.5.6</version>
</dependency>
<dependency>
<groupId>org.mybatis</groupId>
<artifactId>mybatis-spring</artifactId>
<version>2.0.6</version>
</dependency>
<dependency>
<groupId>javax.servlet</groupId>
<artifactId>servlet-api</artifactId>
<version>2.5</version>
</dependency>
<dependency>
<groupId>org.springframework</groupId>
<artifactId>spring-webmvc</artifactId>
<version>5.3.5</version>
</dependency>
<dependency>
<groupId>org.springframework</groupId>
<artifactId>spring-jdbc</artifactId>
<version>5.3.5</version>
</dependency>
</dependencies>
</project>
|
数据源(database.properties)
1
2
3
4
| jdbc.driver=com.mysql.cj.jdbc.Driver
jdbc.url=jdbc:mysql://localhost:3306/ssmbuild?serverTimezone=UTC&characterEncoding=utf8&useSSl=true
jdbc.username=root
jdbc.password=root
|
mybatis配置文件(mtbatis-config.xml)
整合后的mybatis配置文件只写 别名和注册Mapper
1
2
3
4
5
6
7
8
9
10
11
12
13
14
15
16
| <?xml version="1.0" encoding="UTF-8" ?>
<!DOCTYPE configuration
PUBLIC "-//mybatis.org//DTD Config 3.0//EN"
"http://mybatis.org/dtd/mybatis-3-config.dtd">
<configuration>
<typeAliases>
<package name="cn.xpp.pojo"/>
</typeAliases>
<mappers>
<mapper class="cn.xpp.dao.BooksMapper"/>
</mappers>
</configuration>
|
Spring配置文件(applicationcontext.xml)
1
2
3
4
5
6
| <?xml version="1.0" encoding="UTF-8"?>
<beans xmlns="http://www.springframework.org/schema/beans"
xmlns:xsi="http://www.w3.org/2001/XMLSchema-instance"
xsi:schemaLocation="http://www.springframework.org/schema/beans http://www.springframework.org/schema/beans/spring-beans.xsd">
</beans>
|
Mybatis整合
创建spring-dao配置文件 开始整合mybatis
1
2
3
4
5
6
7
8
9
10
11
12
13
14
15
16
17
18
19
20
21
22
23
24
25
26
27
28
29
30
31
32
33
34
35
36
37
38
39
40
41
42
43
44
45
46
47
| <?xml version="1.0" encoding="UTF-8"?>
<beans xmlns="http://www.springframework.org/schema/beans"
xmlns:xsi="http://www.w3.org/2001/XMLSchema-instance"
xmlns:context="http://www.springframework.org/schema/context"
xsi:schemaLocation="http://www.springframework.org/schema/beans http://www.springframework.org/schema/beans/spring-beans.xsd http://www.springframework.org/schema/context https://www.springframework.org/schema/context/spring-context.xsd">
<context:property-placeholder location="classpath:database.properties"/>
<bean class="com.mchange.v2.c3p0.ComboPooledDataSource" id="dataSource">
<property name="driverClass" value="${jdbc.driver}"/>
<property name="jdbcUrl" value="${jdbc.url}"/>
<property name="user" value="${jdbc.username}"/>
<property name="password" value="${jdbc.password}"/>
<property name="maxPoolSize" value="30"/>
<property name="minPoolSize" value="10"/>
<property name="autoCommitOnClose" value="false"/>
<property name="checkoutTimeout" value="10000"/>
<property name="acquireRetryAttempts" value="2"/>
</bean>
<bean class="org.mybatis.spring.SqlSessionFactoryBean" id="sqlSessionFactory">
<property name="dataSource" ref="dataSource"/>
<property name="configLocation" value="classpath:mtbatis-config.xml"/>
</bean>
<bean class="org.mybatis.spring.mapper.MapperScannerConfigurer">
<property name="sqlSessionFactoryBeanName" value="sqlSessionFactory"/>
<property name="basePackage" value="cn.xpp.dao"/>
</bean>
</beans>
|
创建spring-service配置文件
1
2
3
4
5
6
7
8
9
10
11
12
13
14
15
16
17
18
19
20
21
| <?xml version="1.0" encoding="UTF-8"?>
<beans xmlns="http://www.springframework.org/schema/beans"
xmlns:xsi="http://www.w3.org/2001/XMLSchema-instance"
xmlns:conetxt="http://www.springframework.org/schema/context"
xsi:schemaLocation="http://www.springframework.org/schema/beans http://www.springframework.org/schema/beans/spring-beans.xsd http://www.springframework.org/schema/context https://www.springframework.org/schema/context/spring-context.xsd">
<conetxt:component-scan base-package="cn.xpp.service"/>
<bean id="booksService" class="cn.xpp.service.BooksServiceImpl">
<property name="booksMapper" ref="booksMapper"/>
</bean>
<bean id="transactionManager" class="org.springframework.jdbc.datasource.DataSourceTransactionManager">
<property name="dataSource" ref="dataSource"/>
</bean>
</beans>
|
SpringMVC整合
web.xml配置文件内容
1
2
3
4
5
6
7
8
9
10
11
12
13
14
15
16
17
18
19
20
21
22
23
24
25
26
27
28
29
30
|
<servlet>
<servlet-name>springmvc</servlet-name>
<servlet-class>org.springframework.web.servlet.DispatcherServlet</servlet-class>
<init-param>
<param-name>contextConfigLocation</param-name>
<param-value>classpath:applicationcontext.xml</param-value>
</init-param>
<load-on-startup>1</load-on-startup>
</servlet>
<servlet-mapping>
<servlet-name>springmvc</servlet-name>
<url-pattern>/</url-pattern>
</servlet-mapping>
<filter>
<filter-name>encodingFilter</filter-name>
<filter-class>org.springframework.web.filter.CharacterEncodingFilter</filter-class>
<init-param>
<param-name>encoding</param-name>
<param-value>utf-8</param-value>
</init-param>
</filter>
<filter-mapping>
<filter-name>encodingFilter</filter-name>
<url-pattern>/*</url-pattern>
</filter-mapping>
|
创建spring-mvc.xml配置文件
1
2
3
4
5
6
7
8
9
10
11
12
13
14
15
16
17
18
19
20
| <?xml version="1.0" encoding="UTF-8"?>
<beans xmlns="http://www.springframework.org/schema/beans"
xmlns:xsi="http://www.w3.org/2001/XMLSchema-instance"
xmlns:mvc="http://www.springframework.org/schema/mvc"
xmlns:context="http://www.springframework.org/schema/context"
xsi:schemaLocation="http://www.springframework.org/schema/beans http://www.springframework.org/schema/beans/spring-beans.xsd
http://www.springframework.org/schema/mvc http://www.springframework.org/schema/mvc/spring-mvc.xsd
http://www.springframework.org/schema/context http://www.springframework.org/schema/context/spring-context.xsd">
<mvc:annotation-driven/>
<mvc:default-servlet-handler/>
<context:component-scan base-package="cn.xpp.controller"/>
<bean id="internalResourceViewResolver" class="org.springframework.web.servlet.view.InternalResourceViewResolver">
<property name="prefix" value="/WEB-INF/jsp/"/>
<property name="suffix" value=".jsp"/>
</bean>
</beans>
|
注意
- 使用C3P0连接池时,数据源配置必须有前缀jdbc.

整合流程
10,Ajax技术
相当于是一个异步无刷新请求,在一个无需刷新页面的情况下,更新数据,维护用户体验
实现Ajax步骤
-
前往JQuer官网下载JQuer:https://jquery.com/download/
-
将JQuer加入我们的maven项目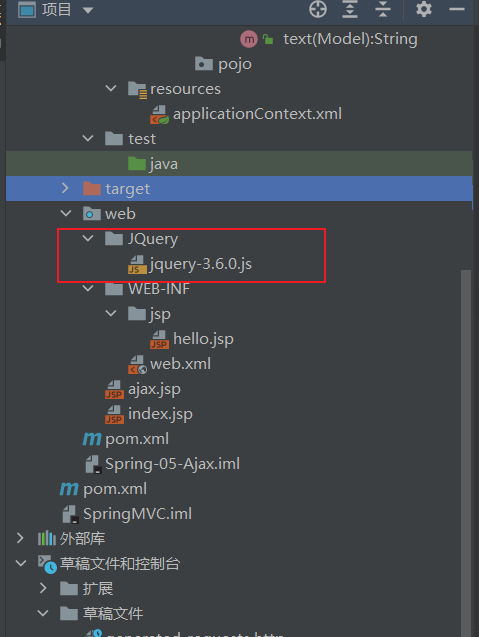
-
书写静态资源过滤器确保我们的JQuery不会被Maven过滤
1
2
3
4
5
6
7
8
9
10
11
12
13
14
15
16
17
18
19
20
21
22
23
24
25
26
27
28
29
30
31
| <build>
<resources>
<resource>
<directory>src/main/java</directory>
<includes>
<include>**/*.properties</include>
<include>**/*.xml</include>
</includes>
<filtering>false</filtering>
</resource>
<resource>
<directory>src/main/resources</directory>
<includes>
<include>**/*.properties</include>
<include>**/*.xml</include>
</includes>
<filtering>false</filtering>
</resource>
<resource>
<directory>web</directory>
<includes>
<include>**/*.properties</include>
<include>**/*.xml</include>
<include>**/*.js</include>
</includes>
<filtering>false</filtering>
</resource>
</resources>
</build>
|
-
书写Ajax(a方法为调用函数)
1
2
3
4
5
6
7
8
9
10
| function a(){
$.ajax({
url:"${pageContext.request.contextPath}/ajax",
data:{"v":$("#value").val()},
success:function (data){
console.log(data)
},
error:function (){}
})
}
|
- $符号就是我们的JQuery的函数库,我们调用ajax方法$.ajax
- ajax内部使用对象的形式书写所以要包含{}符号
- ajax需要三个属性 url,data,回调函数
- url我们ajax调用时数据的处理地址
- data需要处理的数据
- success成功的回调函数(方法的形式)可以传参也可以不传参(参数值为处理后的数据)
- error:失败的回调函数
注意
当我们的后端返回json数据时出现乱码需要在spring配置文件中配置乱码
1
2
3
4
5
6
7
8
9
10
11
12
13
14
15
16
|
<mvc:annotation-driven>
<mvc:message-converters register-defaults="true">
<bean class="org.springframework.http.converter.StringHttpMessageConverter">
<constructor-arg value="UTF-8"/>
</bean>
<bean class="org.springframework.http.converter.json.MappingJackson2HttpMessageConverter">
<property name="objectMapper">
<bean class="org.springframework.http.converter.json.Jackson2ObjectMapperFactoryBean">
<property name="failOnEmptyBeans" value="false"/>
</bean>
</property>
</bean>
</mvc:message-converters>
</mvc:annotation-driven>
|
11,拦截器
实现拦截器接口:HandlerInterceptor
实现对应方法
1
2
3
4
5
6
7
8
9
10
11
12
13
14
15
16
17
18
19
20
21
| public class TestHandlerInterceptor implements HandlerInterceptor {
@Override
public boolean preHandle(HttpServletRequest request, HttpServletResponse response, Object handler) throws Exception {
System.out.println("=======方法执行前=======");
return true;
}
@Override
public void postHandle(HttpServletRequest request, HttpServletResponse response, Object handler, ModelAndView modelAndView) throws Exception {
System.out.println("=======方法执行后=======");
}
@Override
public void afterCompletion(HttpServletRequest request, HttpServletResponse response, Object handler, Exception ex) throws Exception {
System.out.println("=======方法清理=======");
}
}
|
最后因为拦截器是SpringMVC特有的需要在spring配置文件中的mvc标签配置
/**是/下的所有请求都会被TestHandlerInterceptor拦截
1
2
3
4
5
6
| <mvc:interceptors>
<mvc:interceptor>
<mvc:mapping path="/**"/>
<bean class="cn.xpp.config.TestHandlerInterceptor"/>
</mvc:interceptor>
</mvc:interceptors>
|
12,文件上传和下载
简单看看就行,用时直接复制
1,导入对应的jar包
1
2
3
4
5
6
|
<dependency>
<groupId>commons-fileupload</groupId>
<artifactId>commons-fileupload</artifactId>
<version>1.4</version>
</dependency>
|
2,在spring配置文件中配置CommonsMultipartResolver (文件最大值,编码集等等)
1
2
3
4
5
| <bean id="multipartResolver" class="org.springframework.web.multipart.commons.CommonsMultipartResolver">
<property name="defaultEncoding" value="utf-8"/>
<property name="maxUploadSize" value="10485760"/>
<property name="maxInMemorySize" value="40960"/>
</bean>
|
Controller类加上@@RestController注解不走视图解析器
3,编写上传请求
注意上传的表单form标签的enctypes属性一定为"multipart/form-data",表面以二进制上传数据
1
2
3
4
5
6
7
8
9
10
11
12
13
14
15
16
17
18
19
20
21
22
23
24
25
26
27
28
29
30
31
32
33
| @RequestMapping("/upload")
public String upload(@RequestParam("file") CommonsMultipartFile file, HttpServletRequest request) throws IOException {
String uploadFilename=file.getOriginalFilename();
if ("".equals(uploadFilename)){
return "redirect:/index.jsp";
}
System.out.println("文件上传名"+uploadFilename);
String path=request.getSession().getServletContext().getRealPath("/upload");
File realPath=new File(path);
if (!realPath.exists()){
realPath.mkdir();
}
System.out.println("上传文件保存地址:"+realPath);
InputStream is= file.getInputStream();
OutputStream os=new FileOutputStream(new File(realPath,uploadFilename));
int len=0;
byte[] buffer=new byte[1024];
while ((len=is.read(buffer))!=-1){
os.write(buffer,0,len);
os.flush();
}
os.close();;
is.close();;
return "redirect:/index.jsp";
}
|
4,编写下载请求
1
2
3
4
5
6
7
8
9
10
11
12
13
14
15
16
17
18
19
20
21
22
23
24
25
26
27
28
29
30
31
32
33
| @RequestMapping("/download")
public String download(HttpServletRequest request, HttpServletResponse response) throws IOException {
String path=request.getSession().getServletContext().getRealPath("/upload");
String fileName="image-20210409145432188.png";
response.reset();
response.setCharacterEncoding("UTF-8");
response.setContentType("multipart/form-data");
response.setHeader("Content-Disposition", "attachment; " +
"filename="+URLEncoder.encode(fileName,"UTF-8"));
File file=new File(path,fileName);
InputStream is=new FileInputStream(file);
OutputStream os=response.getOutputStream();
byte[] buff=new byte[1024];
int index=0;
while ((index=is.read(buff))!=-1){
os.write(buff,0,index);
os.flush();
}
os.close();
is.close();
return null;
}
|
注意
Controller类加上@@RestController注解不走视图解析器
注意上传的表单form标签的enctypes属性一定为"multipart/form-data",表面以二进制上传数据
13,补充
如果你的html文件在maven中的css和js不起效果可以尝试在web.xml文件中加入(注意在前端控制器前面书写),将js和css、图片设置为可加载资源
1
2
3
4
5
6
7
8
9
10
11
12
13
14
15
16
| <servlet-mapping>
<servlet-name >default </servlet-name >
<url-pattern >*.js</url-pattern>
</servlet-mapping >
<servlet-mapping >
<servlet-name >default </servlet-name >
<url-pattern >*.css</url-pattern>
</servlet-mapping >
<servlet-mapping >
<servlet-name >default </servlet-name >
<url-pattern >*.html</url-pattern>
</servlet-mapping >
<servlet-mapping >
<servlet-name >default </servlet-name >
<url-pattern >*.png</url-pattern>
</servlet-mapping >
|